Print on Demand
Quick Start
Print-on-demand in ListingView in three steps — connect Printify, build a preset, bulk create from it — plus how an order gets routed to your production partner.
Updated
POD Quick Start
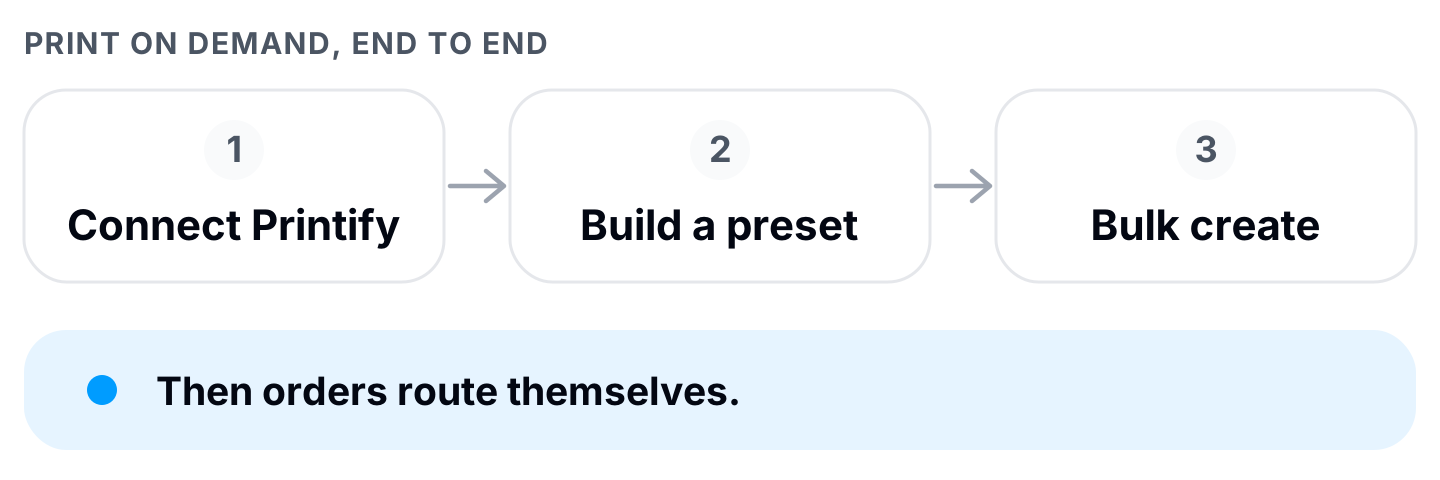
Print-on-demand in ListingView is three steps, then it runs itself:
Connect Printify — once, for your whole account
Build a preset — the product, the designs, the pricing, all decided once
Bulk create from it — a batch of Etsy drafts, one design upload each
After that, orders route with at most one quick step. When a buyer places an order, ListingView sends it to the production partner you picked and tracking goes back on the Etsy order — some shops just paste in the buyer’s address first. Fulfilling Orders covers both paths.
This page is the map. Each step links to the article that goes deep.
Print on Demand is in beta. You’ll see a BETA badge on the POD option in the listing editor’s deliverable-type control.
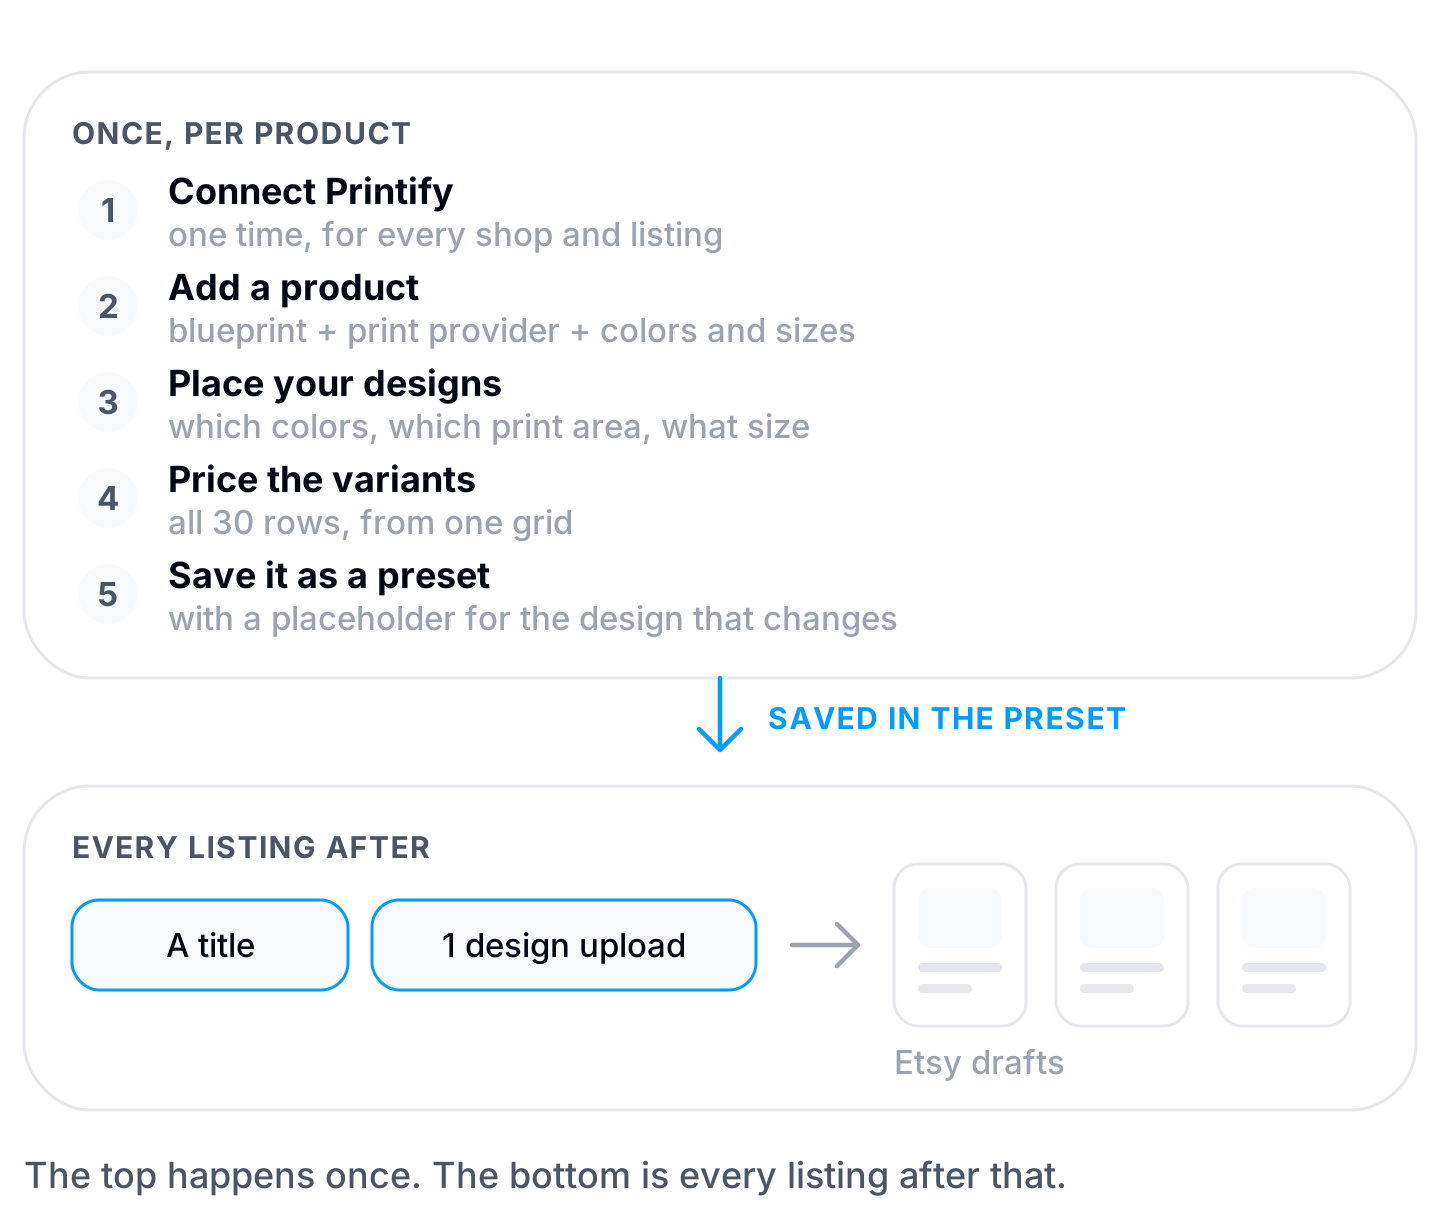
What you do once, and what you do every time
Once, and it’s saved into the preset:
The blueprint and the print provider that fulfills it
Which colors and sizes you sell — a 5-color × 6-size tee is 30 variants
Where each design sits on each print area
Price, quantity and on/off for all 30 variants
Description, core details, category, shipping profile, return policy, renewal option
Mockup slots, so listing photos render themselves
Every listing after that:
A title
One design upload
That asymmetry is the entire value of the feature. Judge your setup by how well it collapses the second list, not by how fast you get through the first.
Step 1 — Connect Printify
Open any listing in Listing Optimizer, scroll to the Product section, and switch the deliverable type to POD. If Printify isn’t connected yet, a Connect your Printify dialog appears — click Connect Printify, authorize on Printify’s side, and you’re returned to ListingView.
One connection covers your whole account: every listing, every shop. Manage it later from Settings → Account.
Step 2 — Build a preset
This is the step that matters. A POD preset is a complete listing blueprint, and everything you put into it is work you never repeat.
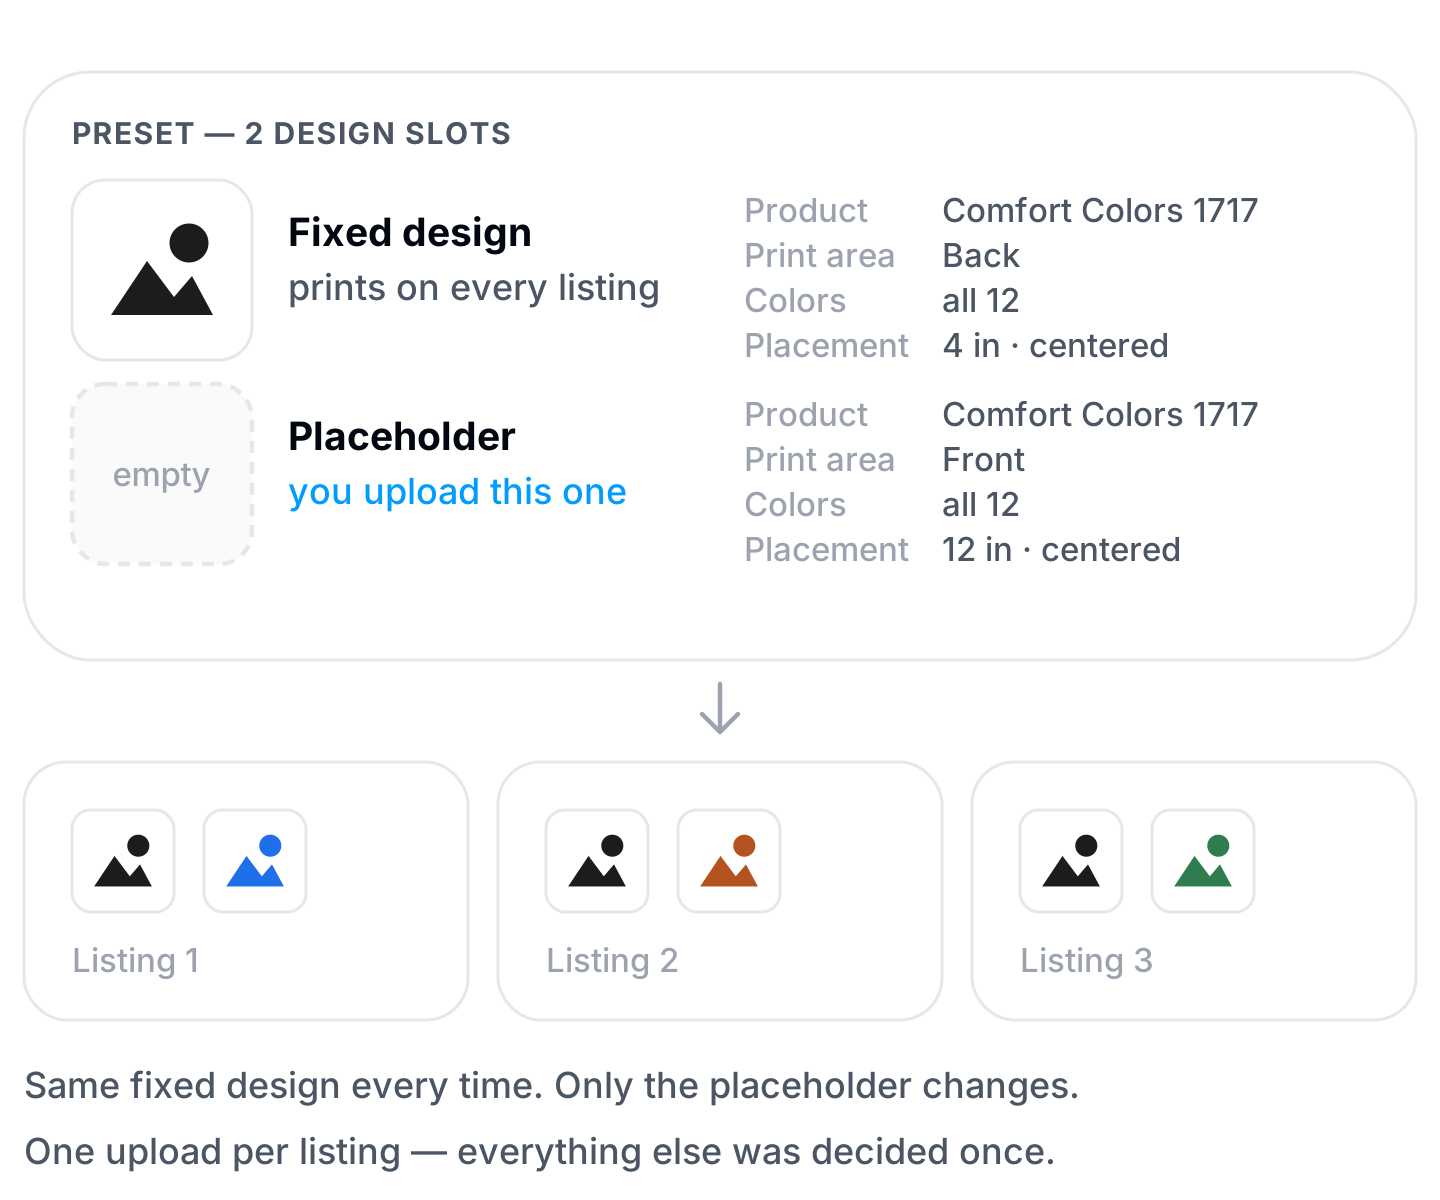
Build one listing properly first. Click + Add Product to pick the product, the print provider, and exactly which colors and sizes you’ll sell. Upload your artwork and link each design to a print area and a set of colors — on any one print area, each color is claimed by exactly one design, which is what makes the standard two-file pattern work (dark artwork on the light colorways, light artwork on the dark ones). Then open the Variations grid and price every variant, watching the Margin column rather than the Price column, since production cost climbs with size.
Leave the SKU fields blank — ListingView mints a unique SKU per listing, and a hard-coded one would be cloned across the whole batch and rejected by Etsy.
Then publish it, look at it on Etsy, and fix what’s wrong — and only then save it as a preset via Presets → Save as Preset. Every mistake in a preset multiplies by the size of your next batch, so it’s worth verifying one live listing before you clone it forty times.
Finally, reserve a slot for the design that changes. Open your preset on the Presets page and click Add a placeholder — a control that only exists in preset mode. A placeholder is a design slot with everything decided except the artwork: product, print area, colors and placement are all reserved. Anything identical on every listing — a logo, a back print — stays a fixed design and needs no input at all.
Detail: Setting Up a POD Product · Designs & Mockups
Step 3 — Bulk create from the preset
Open Bulk Create and pick your POD preset. Two things look different from a normal bulk create:
Price, Quantity and SKU columns are gone. Those live in the preset’s variant matrix now.
Each row shows a design slot per design placement in the preset. Fixed designs appear already filled with no upload control; placeholders appear empty, waiting for this listing’s artwork.
Fill the empty slots — Upload or Browse Library — write or AI-generate the titles, and click Create as draft. Everything is created as an Etsy draft, so you always get a review pass before anything goes live.
Detail: POD Presets & Bulk Create
What happens when an order comes in
Nothing is printed in advance. You’re not holding stock and you haven’t paid for anything — the product only exists once a buyer actually orders it. That’s the whole point of print-on-demand, and it’s the part ListingView automates for you.
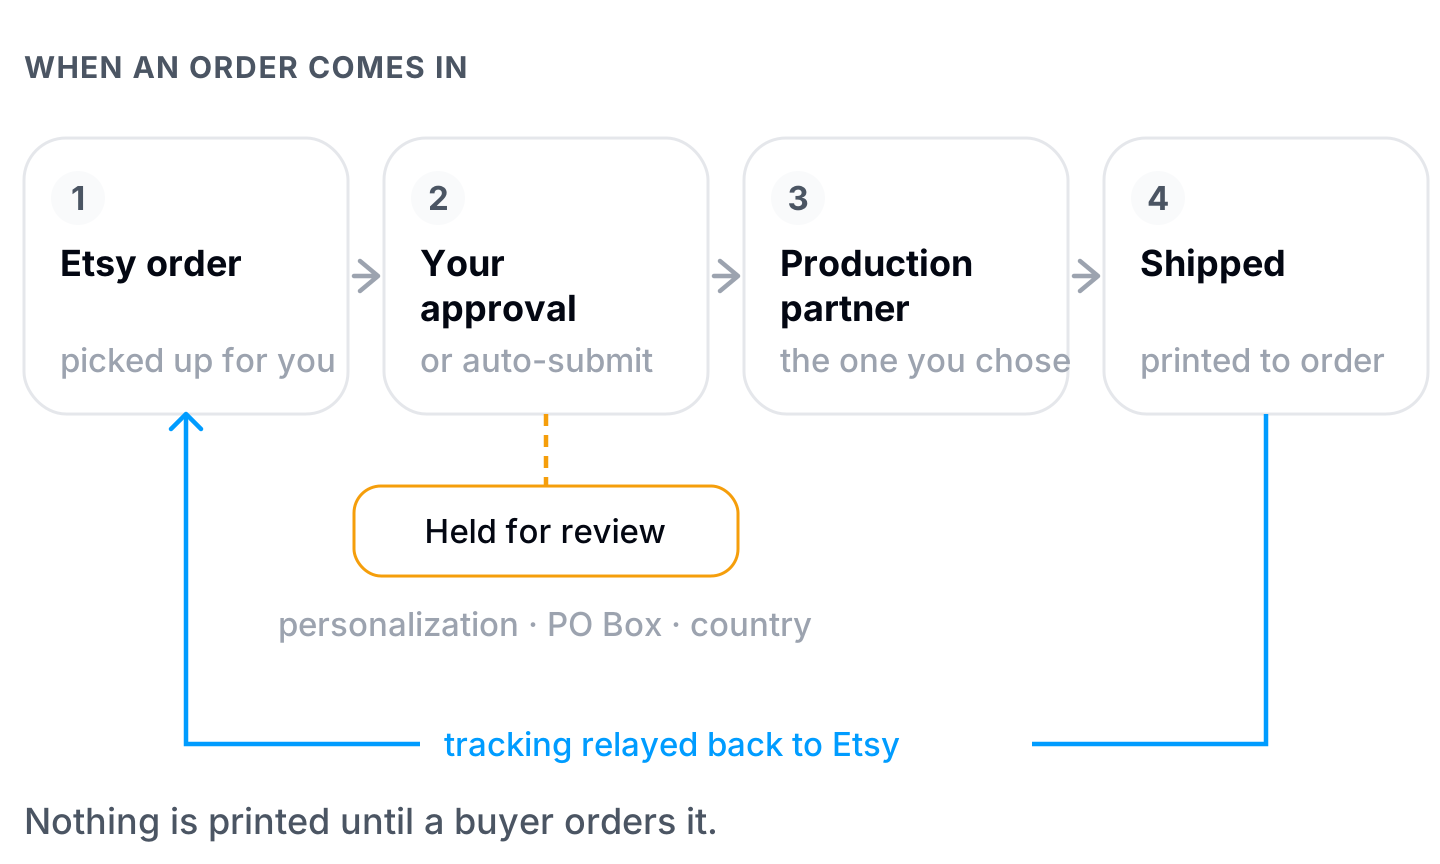
Here’s the sequence:
A buyer orders on Etsy. ListingView picks the order up automatically.
It lands in your approval queue. Open Orders and you’ll find it under Awaiting Approval. Approve individually, or select several and bulk-approve.
ListingView routes it to your production partner. On approval, the order is created in Printify against the exact print provider you chose when you built the product — plus the right variant, the right colors, and your design file already positioned.
The partner prints and ships it. Production and delivery happen on their side; you don’t touch it.
Tracking goes back to Etsy automatically. When the partner ships, ListingView relays the tracking number to Etsy as a shipment notification, so the buyer gets their update without you copying anything across.
Approving automatically
Approval is manual by default — every order waits for you. If you’d rather skip the queue, auto-submit sends eligible orders straight to Printify without review. It’s a Plus feature, it’s configured per Etsy shop in Settings, and it needs you to reconnect Etsy to grant the shipping-update permission.
The safety holds
Even with auto-submit on, some orders are deliberately pulled out of the automatic path and held for you to look at. All three holds are on by default:
Personalization — the buyer typed custom text, which usually needs a human to read it
PO Box addresses — many print providers can’t deliver to them
Countries outside your allow-list — you decide which countries to fulfill to
Held orders sit in the queue rather than failing, and ListingView emails you when one needs attention — and separately if tracking ever fails to reach Etsy.
Where each piece lives
Once you’ve walked the path, this is the mental model that explains the rest of the feature — in particular what a preset can and can’t carry.
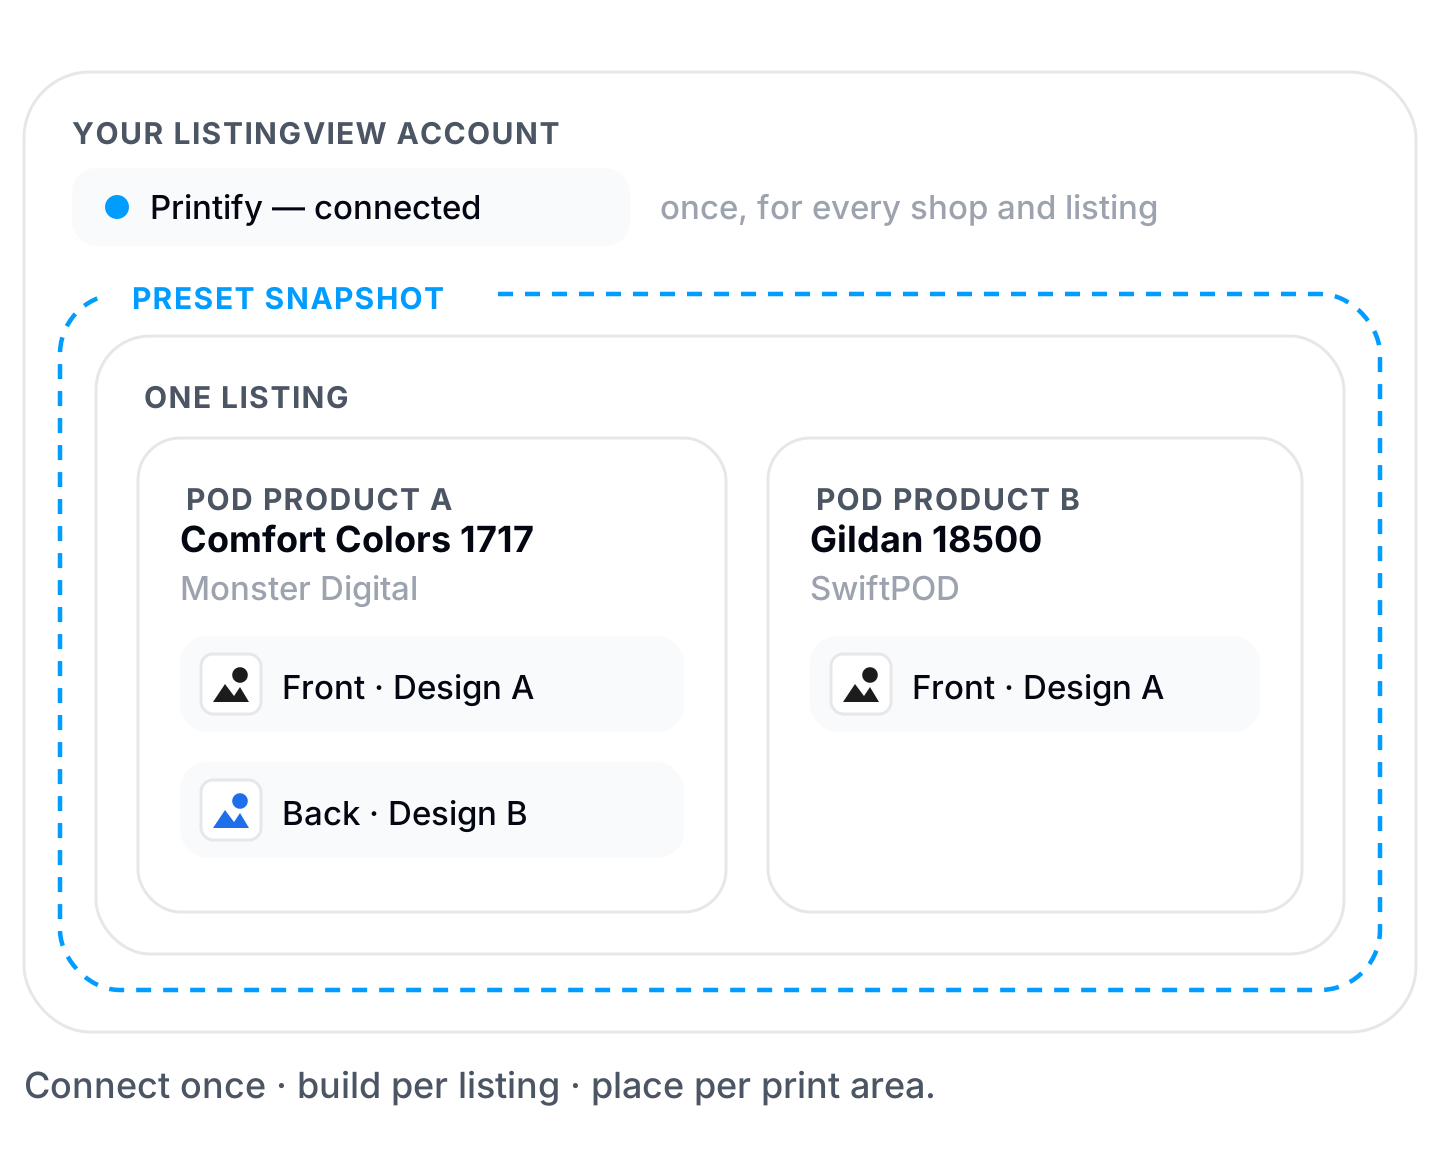
Printify connection — account level. Done once, shared by every listing and every shop.
POD product — listing level. A blueprint, a provider, and your chosen colors and sizes. One listing can hold several.
Design placement — product level. One design file, on one print area, for a set of colors.
Preset — a snapshot of the listing and everything inside it, replayable onto new listings.
Two things that will actually stop you
Most of what the POD panel tells you is advice. Two things are hard stops.
An unfilled placeholder blocks publishing. If a listing has a reserved slot with no artwork in it, you can’t publish — the panel says “Upload a design into each reserved slot before publishing.” That’s deliberate: it stops a listing going live with a blank print area. This is the only publish block in the design panel.
A preset has to pass eight checks before Bulk Create will use it. Six are ordinary listing fields — description, core details, Etsy category, shipping profile, return policy, renewal option. Two are POD-specific and are where presets usually get stuck:
Base price set — derived automatically from your cheapest priced variant, so pricing the variant matrix satisfies it. Re-save the preset after changing prices; the base price is captured at save time.
No custom SKUs — clear any SKU values in the variant matrix and re-save.
On the Presets page, hover the Bulk-create button to see exactly which check is failing.
Worth noting what isn’t a hard stop: the Uncovered colors warning. If a color you’re selling has no design assigned, the panel flags it, but nothing prevents you from publishing. Still fix it — an uncovered color is a variant a buyer can order with nothing to print — but it won’t block you.
Common questions
What do I need before I start?
A Printify account (any plan) and at least one design file. Your Printify plan affects your production costs, not the integration.
Do the listings go live on Etsy automatically?
No. Bulk Create produces drafts. You review and publish them yourself.
Do I have to approve every order?
By default, yes — nothing goes to production without you. Auto-submit removes that step for eligible orders on the Plus plan.
Do I pay for anything before a sale?
No. Nothing is produced until a real order comes in; your production partner charges you at that point, which is why the Margin column in the variant matrix matters.
Which print provider fulfills my order?
The one you selected when you built the product. That choice is stored on the product and is what the order routes to.
Do I have to send tracking to Etsy myself?
No. When your partner ships, ListingView relays the tracking number to Etsy for you, and emails you if that ever fails.
Do I have to cover every color with a design?
No — that warning is advisory. The only thing that blocks publishing is an unfilled placeholder slot.
How many designs can one listing use?
Ten. Designs are labeled A–J, and that lettering is the binding cap — an eleventh design has no slot letter to attach to.
Related features
Print on Demand — The fuller overview, with key concepts and Printify setup.
Setting Up a POD Product — Catalog, print providers, colors and sizes, variant pricing.
Designs & Mockups — Placement, colorways, placeholders, and automatic listing photos.
POD Presets & Bulk Create — The full batch workflow.
Presets — How presets work across all listing types.
Asset Library — Where design files and mockup templates live.
POD Quick Start
Print-on-demand in ListingView is three steps, then it runs itself:
Connect Printify — once, for your whole account
Build a preset — the product, the designs, the pricing, all decided once
Bulk create from it — a batch of Etsy drafts, one design upload each
After that, orders route with at most one quick step. When a buyer places an order, ListingView sends it to the production partner you picked and tracking goes back on the Etsy order — some shops just paste in the buyer’s address first. Fulfilling Orders covers both paths.
This page is the map. Each step links to the article that goes deep.
Print on Demand is in beta. You’ll see a BETA badge on the POD option in the listing editor’s deliverable-type control.
What you do once, and what you do every time
Once, and it’s saved into the preset:
The blueprint and the print provider that fulfills it
Which colors and sizes you sell — a 5-color × 6-size tee is 30 variants
Where each design sits on each print area
Price, quantity and on/off for all 30 variants
Description, core details, category, shipping profile, return policy, renewal option
Mockup slots, so listing photos render themselves
Every listing after that:
A title
One design upload
That asymmetry is the entire value of the feature. Judge your setup by how well it collapses the second list, not by how fast you get through the first.
Step 1 — Connect Printify
Open any listing in Listing Optimizer, scroll to the Product section, and switch the deliverable type to POD. If Printify isn’t connected yet, a Connect your Printify dialog appears — click Connect Printify, authorize on Printify’s side, and you’re returned to ListingView.
One connection covers your whole account: every listing, every shop. Manage it later from Settings → Account.
Step 2 — Build a preset
This is the step that matters. A POD preset is a complete listing blueprint, and everything you put into it is work you never repeat.
Build one listing properly first. Click + Add Product to pick the product, the print provider, and exactly which colors and sizes you’ll sell. Upload your artwork and link each design to a print area and a set of colors — on any one print area, each color is claimed by exactly one design, which is what makes the standard two-file pattern work (dark artwork on the light colorways, light artwork on the dark ones). Then open the Variations grid and price every variant, watching the Margin column rather than the Price column, since production cost climbs with size.
Leave the SKU fields blank — ListingView mints a unique SKU per listing, and a hard-coded one would be cloned across the whole batch and rejected by Etsy.
Then publish it, look at it on Etsy, and fix what’s wrong — and only then save it as a preset via Presets → Save as Preset. Every mistake in a preset multiplies by the size of your next batch, so it’s worth verifying one live listing before you clone it forty times.
Finally, reserve a slot for the design that changes. Open your preset on the Presets page and click Add a placeholder — a control that only exists in preset mode. A placeholder is a design slot with everything decided except the artwork: product, print area, colors and placement are all reserved. Anything identical on every listing — a logo, a back print — stays a fixed design and needs no input at all.
Detail: Setting Up a POD Product · Designs & Mockups
Step 3 — Bulk create from the preset
Open Bulk Create and pick your POD preset. Two things look different from a normal bulk create:
Price, Quantity and SKU columns are gone. Those live in the preset’s variant matrix now.
Each row shows a design slot per design placement in the preset. Fixed designs appear already filled with no upload control; placeholders appear empty, waiting for this listing’s artwork.
Fill the empty slots — Upload or Browse Library — write or AI-generate the titles, and click Create as draft. Everything is created as an Etsy draft, so you always get a review pass before anything goes live.
Detail: POD Presets & Bulk Create
What happens when an order comes in
Nothing is printed in advance. You’re not holding stock and you haven’t paid for anything — the product only exists once a buyer actually orders it. That’s the whole point of print-on-demand, and it’s the part ListingView automates for you.
Here’s the sequence:
A buyer orders on Etsy. ListingView picks the order up automatically.
It lands in your approval queue. Open Orders and you’ll find it under Awaiting Approval. Approve individually, or select several and bulk-approve.
ListingView routes it to your production partner. On approval, the order is created in Printify against the exact print provider you chose when you built the product — plus the right variant, the right colors, and your design file already positioned.
The partner prints and ships it. Production and delivery happen on their side; you don’t touch it.
Tracking goes back to Etsy automatically. When the partner ships, ListingView relays the tracking number to Etsy as a shipment notification, so the buyer gets their update without you copying anything across.
Approving automatically
Approval is manual by default — every order waits for you. If you’d rather skip the queue, auto-submit sends eligible orders straight to Printify without review. It’s a Plus feature, it’s configured per Etsy shop in Settings, and it needs you to reconnect Etsy to grant the shipping-update permission.
The safety holds
Even with auto-submit on, some orders are deliberately pulled out of the automatic path and held for you to look at. All three holds are on by default:
Personalization — the buyer typed custom text, which usually needs a human to read it
PO Box addresses — many print providers can’t deliver to them
Countries outside your allow-list — you decide which countries to fulfill to
Held orders sit in the queue rather than failing, and ListingView emails you when one needs attention — and separately if tracking ever fails to reach Etsy.
Where each piece lives
Once you’ve walked the path, this is the mental model that explains the rest of the feature — in particular what a preset can and can’t carry.
Printify connection — account level. Done once, shared by every listing and every shop.
POD product — listing level. A blueprint, a provider, and your chosen colors and sizes. One listing can hold several.
Design placement — product level. One design file, on one print area, for a set of colors.
Preset — a snapshot of the listing and everything inside it, replayable onto new listings.
Two things that will actually stop you
Most of what the POD panel tells you is advice. Two things are hard stops.
An unfilled placeholder blocks publishing. If a listing has a reserved slot with no artwork in it, you can’t publish — the panel says “Upload a design into each reserved slot before publishing.” That’s deliberate: it stops a listing going live with a blank print area. This is the only publish block in the design panel.
A preset has to pass eight checks before Bulk Create will use it. Six are ordinary listing fields — description, core details, Etsy category, shipping profile, return policy, renewal option. Two are POD-specific and are where presets usually get stuck:
Base price set — derived automatically from your cheapest priced variant, so pricing the variant matrix satisfies it. Re-save the preset after changing prices; the base price is captured at save time.
No custom SKUs — clear any SKU values in the variant matrix and re-save.
On the Presets page, hover the Bulk-create button to see exactly which check is failing.
Worth noting what isn’t a hard stop: the Uncovered colors warning. If a color you’re selling has no design assigned, the panel flags it, but nothing prevents you from publishing. Still fix it — an uncovered color is a variant a buyer can order with nothing to print — but it won’t block you.
Common questions
What do I need before I start?
A Printify account (any plan) and at least one design file. Your Printify plan affects your production costs, not the integration.
Do the listings go live on Etsy automatically?
No. Bulk Create produces drafts. You review and publish them yourself.
Do I have to approve every order?
By default, yes — nothing goes to production without you. Auto-submit removes that step for eligible orders on the Plus plan.
Do I pay for anything before a sale?
No. Nothing is produced until a real order comes in; your production partner charges you at that point, which is why the Margin column in the variant matrix matters.
Which print provider fulfills my order?
The one you selected when you built the product. That choice is stored on the product and is what the order routes to.
Do I have to send tracking to Etsy myself?
No. When your partner ships, ListingView relays the tracking number to Etsy for you, and emails you if that ever fails.
Do I have to cover every color with a design?
No — that warning is advisory. The only thing that blocks publishing is an unfilled placeholder slot.
How many designs can one listing use?
Ten. Designs are labeled A–J, and that lettering is the binding cap — an eleventh design has no slot letter to attach to.
Related features
Print on Demand — The fuller overview, with key concepts and Printify setup.
Setting Up a POD Product — Catalog, print providers, colors and sizes, variant pricing.
Designs & Mockups — Placement, colorways, placeholders, and automatic listing photos.
POD Presets & Bulk Create — The full batch workflow.
Presets — How presets work across all listing types.
Asset Library — Where design files and mockup templates live.
Print on Demand is in beta. It’s your responsibility to make sure design quality, print placement, and order details are correct before an order goes into production. By using the integration, you agree to our Terms of Service and understand that ListingView is not responsible for order accuracy.
Still need help?
Can’t find what you’re looking for? Our team is happy to help.
Summarize