Print on Demand
Designs & Mockups
Upload artwork, place it on print areas with the canvas editor, assign designs to light and dark colorways, and auto-generate listing photos from mockup templates.
Updated
Designs & Mockups
Once a POD product is attached to your listing, the design panel below it is where you connect artwork to that product: which design, on which print area, for which colors. The same designs then feed your listing photos through mockup slots, so you aren't exporting mockups by hand.
Adding designs
There are two ways to get artwork into the panel:
Upload — drag files onto the dropzone or click to browse your computer
Browse Library — pull an existing file from your Asset Library, so a logo or recurring graphic doesn't need re-uploading
Each design becomes a card labeled Design A, Design B, and so on. That letter matters later — mockup slots and Bulk Create both refer to designs by their slot letter.
Resolution check
Every design card carries a resolution badge:
High Resolution — 300 DPI or better at the print size. Meets print-on-demand requirements.
Low Resolution — below 300 DPI. It will still print, but expect softness and visible pixelation on large prints.
Fix low resolution at the source. Upscaling a small file in an image editor adds pixels but no detail, and the badge is measuring detail.
Linking a design to a product
A design on its own does nothing — it has to be linked to a product, a print area, and a set of colors. Use Link all to attach the design to every POD product on the listing, or Link another to add one link at a time.
Each link appears as a Linked Product box under the design card, showing:
Product — which POD product this link targets
Print area — front, back, sleeve, and so on
Color — which colorways this design covers, with a claimed count like 8 / 12
One design per color, per print area
This is the rule that governs the whole panel: on a given print area, each color can be claimed by exactly one design. Two designs can't both print on the front of a Black shirt.
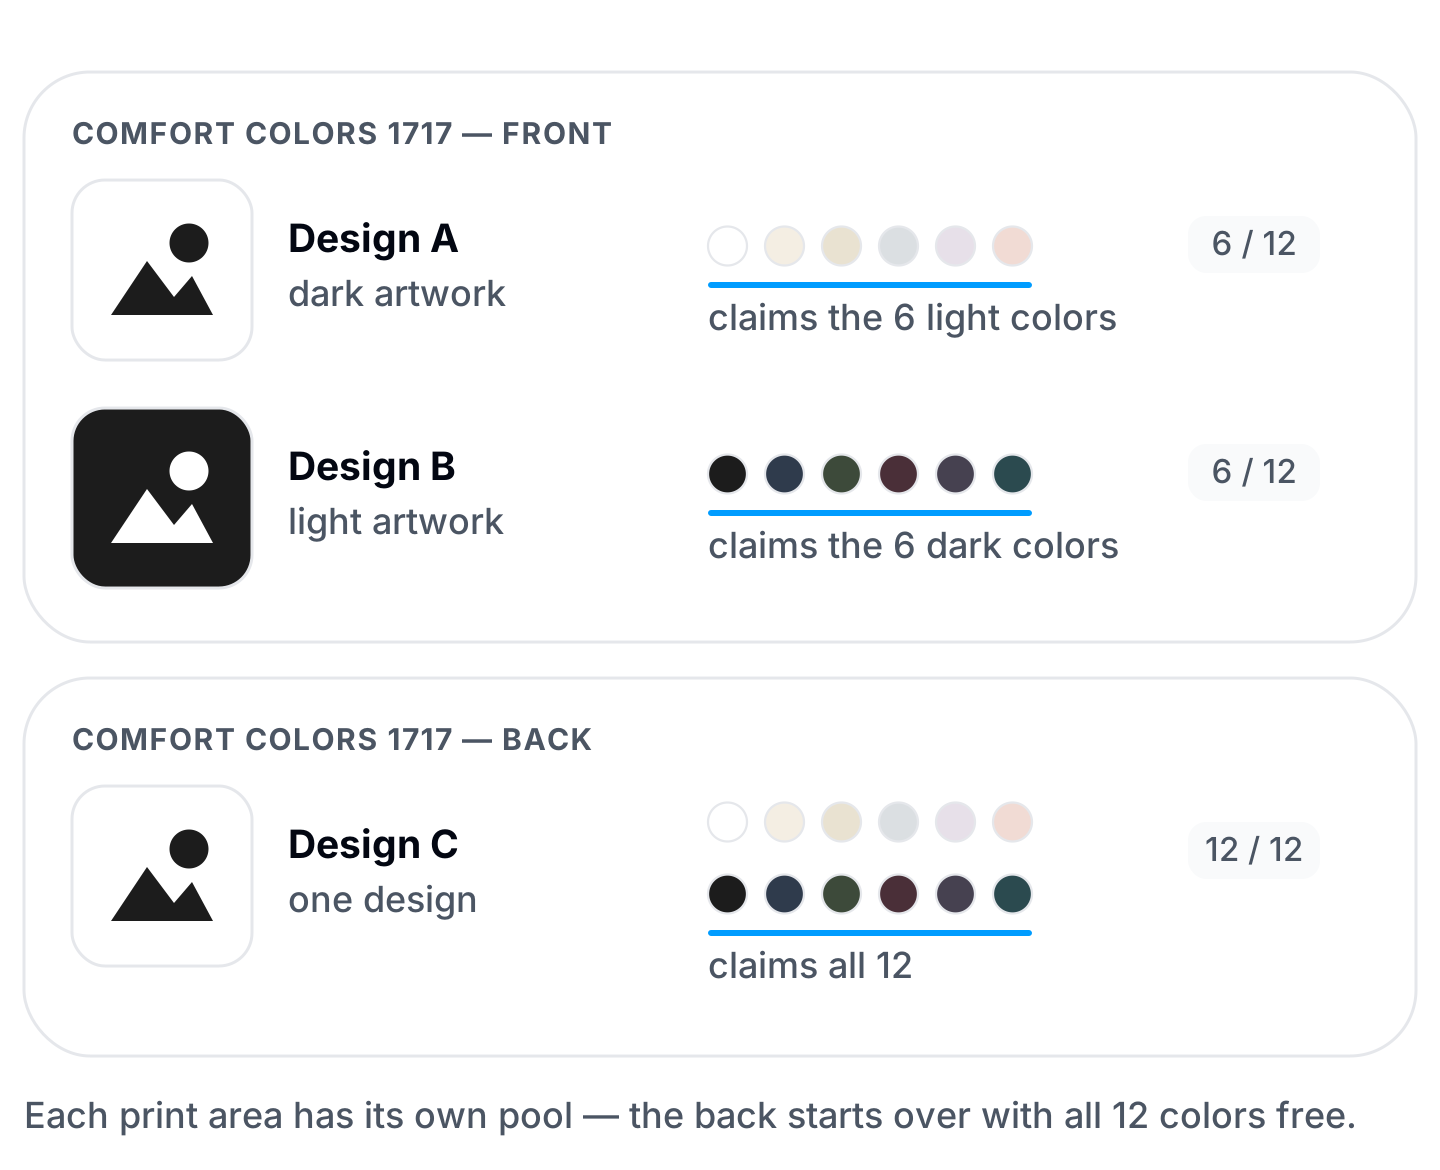
That constraint is what makes light/dark colorways work. Open the color settings on a link and you get:
Add dark colors — claim every dark colorway in one click
Add light colors — claim every light colorway in one click
Select Available — claim everything not already taken by another design
Deselect All / Clear selection — release colors back to the pool
So the standard two-file workflow is: Design A (dark artwork) claims the light colors, Design B (light artwork) claims the dark colors. Two clicks, no manual checkbox hunting.
If you try to claim colors another design already owns, you'll see All colors for this print area are already claimed — release them from the other design first.
Coverage
Every selected color should end up covered by some design. Anything left over is listed under an Uncovered colors heading in the panel.
Worth fixing before you publish: an uncovered color is a variant a buyer can order that has no artwork to print. But note this one is advisory — it warns you, it doesn't stop you. The only thing that actually blocks publishing is an unfilled placeholder slot, covered below.
Placing the design with the canvas editor
Click Open canvas editor on a link to position the artwork on the print area.
The editor gives you:
Drag, scale, and rotate the design within the print area's bounds
Size constraints — lock a specific Width or Height in inches so the print measures exactly what you intend
Alignment — align left, right, top, bottom, center, or center vertical against the print area
Snap-to-guides — toggle snapping on or off for precise or freehand positioning
Garment preview — flip between light and dark garment backgrounds to check how the artwork reads on each
Resolution readout — High Res, Medium Res, or Low Res at the current size, updating live as you scale
That last one is the useful one. A file that reads High Res at 8 inches wide can drop to Low Res when you scale it to 14. The editor tells you before the customer finds out.
Positioning is stored as a rule, not as fixed pixels — it stays proportionally correct if you later switch print providers or add a product whose print area is a different size.
Placeholder slots
Sometimes you want a template that says "a design goes here" without committing to a specific file. That's what Add a placeholder creates: a slot that already knows its product, print area, colors, and placement — everything except the artwork.
Placeholders are built on the Presets page, not in the single-listing editor. The Add a placeholder button only appears while you're building or editing a preset — which makes sense, since a placeholder exists to be filled by the listings that preset produces.
Placeholders are the mechanism that makes POD presets work. A preset can carry:
Fixed designs — your logo, a back-print, a sleeve mark. Baked in, printed as-is on every listing.
Placeholder slots — fully configured placements with the artwork left out. This is where the design that actually differs per listing goes.
A listing with an unfilled placeholder is publish-blocked, and the panel says so: "Upload a design into each reserved slot before publishing." That's deliberate — it stops a listing from going live with a blank print area.
Mockup slots — automatic listing photos
Rather than exporting mockups in an image editor and uploading them, you can point a listing photo position at a mockup template plus a design, and let ListingView render it.
Set up your mockup templates first
Mockup templates live in your Asset Library under the Mockup Templates tab. A template is the scene or frame — the flat-lay photo, the model shot, the hanging tee — with a saved region marking where a design should land. PSD files are supported.
If you haven't uploaded any, the mockup slot picker tells you: "No mockup templates yet."
Assign a slot
Mockup slots are also preset-only — open your preset on the Presets page, go to the Photos & Videos section, and choose Use mockup slot on an empty photo position. Then pick:
A mockup template from your library grid, with search
A design — referenced by slot position: "Your listing's first design file", "second", and so on, up to ten
Click Save slot. Rendering happens in the background — you don't wait on it — and the finished image lands in that photo position when it's ready.
Because the slot references a design by position rather than by filename, the same configuration works across every listing built from the preset. Listing 1 renders with its first design, listing 40 renders with its own. Set it up once.
Tips & best practices
Name your design files descriptively before uploading. They carry into the Asset Library and into the design cards, and "final_v3_ACTUAL.png" is not a searchable name six months from now.
Build the light/dark pair as a habit. Dark artwork on light shirts, light artwork on dark shirts. Two files and two clicks covers a full colorway range and dramatically outperforms one file forced onto every color.
Check resolution at your largest print size, not your smallest. The canvas editor's live readout is the number that matters — scale the design up to its biggest placement and confirm it still says High Res.
Use a placeholder for the design that changes, fixed designs for everything else. A preset with a fixed back logo and a front placeholder is the fastest possible POD workflow: upload one file per listing and everything else is done.
Set up mockup slots before saving the preset. Slot configuration carries into every listing built from it. Doing it once at preset time means every bulk-created listing arrives with photos already rendering.
Clear uncovered-color warnings before you publish. Nothing forces you to — the warning is advisory — but an uncovered color is an orderable variant with nothing to print, and you'll find out when a customer orders it.
Common questions
Can one design cover multiple print areas?
Yes. Add a link per print area with Link another. The same file can print on the front and the back with independent placement on each.
Can I use the same design on different products?
Yes. Link all attaches a design to every POD product on the listing at once, and placement stays proportionally correct across differently sized print areas.
What DPI do my design files need to be?
300 DPI at the print size. The badge on each design card reflects that threshold, and the canvas editor recalculates it live as you resize.
Why can't I select a color for this design?
Another design already claims it on that print area. Only one design can own a given color on a given area — release it from the other design first.
Are there limits on mockup rendering?
Yes, as daily caps. Standard in-house renders are capped at 1,000 per day on every plan, including free — though free-tier renders carry a watermark. PSD-based template renders are capped at 100 per day on paid plans and aren't available on the free tier. See Plans & Billing for what your plan includes.
Can I mix mockup slots and uploaded photos in the same listing?
Yes. Individual photo positions are independent — configure some as mockup slots and upload others directly.
What happens if I delete a design that a mockup slot points to?
The slot references a design by position, so it re-resolves to whatever design occupies that position. If nothing does, the slot renders nothing — re-check your photo positions after removing a design.
Related features
Print on Demand — Overview and Printify setup.
Setting Up a POD Product — Build the product your designs attach to.
POD Presets & Bulk Create — Reuse fixed designs and placeholder slots across a batch.
Asset Library — Where design files and mockup templates live.
Designs & Mockups
Once a POD product is attached to your listing, the design panel below it is where you connect artwork to that product: which design, on which print area, for which colors. The same designs then feed your listing photos through mockup slots, so you aren't exporting mockups by hand.
Adding designs
There are two ways to get artwork into the panel:
Upload — drag files onto the dropzone or click to browse your computer
Browse Library — pull an existing file from your Asset Library, so a logo or recurring graphic doesn't need re-uploading
Each design becomes a card labeled Design A, Design B, and so on. That letter matters later — mockup slots and Bulk Create both refer to designs by their slot letter.
Resolution check
Every design card carries a resolution badge:
High Resolution — 300 DPI or better at the print size. Meets print-on-demand requirements.
Low Resolution — below 300 DPI. It will still print, but expect softness and visible pixelation on large prints.
Fix low resolution at the source. Upscaling a small file in an image editor adds pixels but no detail, and the badge is measuring detail.
Linking a design to a product
A design on its own does nothing — it has to be linked to a product, a print area, and a set of colors. Use Link all to attach the design to every POD product on the listing, or Link another to add one link at a time.
Each link appears as a Linked Product box under the design card, showing:
Product — which POD product this link targets
Print area — front, back, sleeve, and so on
Color — which colorways this design covers, with a claimed count like 8 / 12
One design per color, per print area
This is the rule that governs the whole panel: on a given print area, each color can be claimed by exactly one design. Two designs can't both print on the front of a Black shirt.
That constraint is what makes light/dark colorways work. Open the color settings on a link and you get:
Add dark colors — claim every dark colorway in one click
Add light colors — claim every light colorway in one click
Select Available — claim everything not already taken by another design
Deselect All / Clear selection — release colors back to the pool
So the standard two-file workflow is: Design A (dark artwork) claims the light colors, Design B (light artwork) claims the dark colors. Two clicks, no manual checkbox hunting.
If you try to claim colors another design already owns, you'll see All colors for this print area are already claimed — release them from the other design first.
Coverage
Every selected color should end up covered by some design. Anything left over is listed under an Uncovered colors heading in the panel.
Worth fixing before you publish: an uncovered color is a variant a buyer can order that has no artwork to print. But note this one is advisory — it warns you, it doesn't stop you. The only thing that actually blocks publishing is an unfilled placeholder slot, covered below.
Placing the design with the canvas editor
Click Open canvas editor on a link to position the artwork on the print area.
The editor gives you:
Drag, scale, and rotate the design within the print area's bounds
Size constraints — lock a specific Width or Height in inches so the print measures exactly what you intend
Alignment — align left, right, top, bottom, center, or center vertical against the print area
Snap-to-guides — toggle snapping on or off for precise or freehand positioning
Garment preview — flip between light and dark garment backgrounds to check how the artwork reads on each
Resolution readout — High Res, Medium Res, or Low Res at the current size, updating live as you scale
That last one is the useful one. A file that reads High Res at 8 inches wide can drop to Low Res when you scale it to 14. The editor tells you before the customer finds out.
Positioning is stored as a rule, not as fixed pixels — it stays proportionally correct if you later switch print providers or add a product whose print area is a different size.
Placeholder slots
Sometimes you want a template that says "a design goes here" without committing to a specific file. That's what Add a placeholder creates: a slot that already knows its product, print area, colors, and placement — everything except the artwork.
Placeholders are built on the Presets page, not in the single-listing editor. The Add a placeholder button only appears while you're building or editing a preset — which makes sense, since a placeholder exists to be filled by the listings that preset produces.
Placeholders are the mechanism that makes POD presets work. A preset can carry:
Fixed designs — your logo, a back-print, a sleeve mark. Baked in, printed as-is on every listing.
Placeholder slots — fully configured placements with the artwork left out. This is where the design that actually differs per listing goes.
A listing with an unfilled placeholder is publish-blocked, and the panel says so: "Upload a design into each reserved slot before publishing." That's deliberate — it stops a listing from going live with a blank print area.
Mockup slots — automatic listing photos
Rather than exporting mockups in an image editor and uploading them, you can point a listing photo position at a mockup template plus a design, and let ListingView render it.
Set up your mockup templates first
Mockup templates live in your Asset Library under the Mockup Templates tab. A template is the scene or frame — the flat-lay photo, the model shot, the hanging tee — with a saved region marking where a design should land. PSD files are supported.
If you haven't uploaded any, the mockup slot picker tells you: "No mockup templates yet."
Assign a slot
Mockup slots are also preset-only — open your preset on the Presets page, go to the Photos & Videos section, and choose Use mockup slot on an empty photo position. Then pick:
A mockup template from your library grid, with search
A design — referenced by slot position: "Your listing's first design file", "second", and so on, up to ten
Click Save slot. Rendering happens in the background — you don't wait on it — and the finished image lands in that photo position when it's ready.
Because the slot references a design by position rather than by filename, the same configuration works across every listing built from the preset. Listing 1 renders with its first design, listing 40 renders with its own. Set it up once.
Tips & best practices
Name your design files descriptively before uploading. They carry into the Asset Library and into the design cards, and "final_v3_ACTUAL.png" is not a searchable name six months from now.
Build the light/dark pair as a habit. Dark artwork on light shirts, light artwork on dark shirts. Two files and two clicks covers a full colorway range and dramatically outperforms one file forced onto every color.
Check resolution at your largest print size, not your smallest. The canvas editor's live readout is the number that matters — scale the design up to its biggest placement and confirm it still says High Res.
Use a placeholder for the design that changes, fixed designs for everything else. A preset with a fixed back logo and a front placeholder is the fastest possible POD workflow: upload one file per listing and everything else is done.
Set up mockup slots before saving the preset. Slot configuration carries into every listing built from it. Doing it once at preset time means every bulk-created listing arrives with photos already rendering.
Clear uncovered-color warnings before you publish. Nothing forces you to — the warning is advisory — but an uncovered color is an orderable variant with nothing to print, and you'll find out when a customer orders it.
Common questions
Can one design cover multiple print areas?
Yes. Add a link per print area with Link another. The same file can print on the front and the back with independent placement on each.
Can I use the same design on different products?
Yes. Link all attaches a design to every POD product on the listing at once, and placement stays proportionally correct across differently sized print areas.
What DPI do my design files need to be?
300 DPI at the print size. The badge on each design card reflects that threshold, and the canvas editor recalculates it live as you resize.
Why can't I select a color for this design?
Another design already claims it on that print area. Only one design can own a given color on a given area — release it from the other design first.
Are there limits on mockup rendering?
Yes, as daily caps. Standard in-house renders are capped at 1,000 per day on every plan, including free — though free-tier renders carry a watermark. PSD-based template renders are capped at 100 per day on paid plans and aren't available on the free tier. See Plans & Billing for what your plan includes.
Can I mix mockup slots and uploaded photos in the same listing?
Yes. Individual photo positions are independent — configure some as mockup slots and upload others directly.
What happens if I delete a design that a mockup slot points to?
The slot references a design by position, so it re-resolves to whatever design occupies that position. If nothing does, the slot renders nothing — re-check your photo positions after removing a design.
Related features
Print on Demand — Overview and Printify setup.
Setting Up a POD Product — Build the product your designs attach to.
POD Presets & Bulk Create — Reuse fixed designs and placeholder slots across a batch.
Asset Library — Where design files and mockup templates live.
Print on Demand is in beta. It’s your responsibility to make sure design quality, print placement, and order details are correct before an order goes into production. By using the integration, you agree to our Terms of Service and understand that ListingView is not responsible for order accuracy.
Still need help?
Can’t find what you’re looking for? Our team is happy to help.
Summarize