Print on Demand
Print on Demand Overview
Connect Printify to ListingView, build print-on-demand products inside your listings, and turn one setup into dozens of Etsy listings with presets and Bulk Create.
Updated
Print on Demand
Print on Demand (POD) lets you build a real Printify product — blueprint, print provider, colors, sizes, design placement, and per-variant pricing — directly inside a ListingView listing. Once you've built it once, you save it as a preset and Bulk Create turns that single setup into as many Etsy listings as you have designs.
That last part is the whole point. Setting up one POD listing by hand is tedious but survivable. Setting up forty is the reason most sellers stall out. POD in ListingView is designed so you do the tedious part once.
Print on Demand is in beta. You'll see a BETA badge on the POD option inside the listing editor. The feature works end to end, but we're still stabilizing it — if something looks wrong, tell us and we'll get on it quickly.
What you can do with Print on Demand
Connect your Printify account to ListingView once, and browse the full Printify catalog without leaving a listing
Pick a blueprint and a print provider, then choose exactly which colors and sizes you want to sell
Bundle multiple POD products in one listing — a tee, a hoodie, and a mug can all live under a single Etsy listing
Upload designs (or pull them from your Asset Library) and place them on any print area
Assign different designs to different colorways — a light-shirt version and a dark-shirt version of the same artwork
Set price, quantity, and SKU across every variant from one grid, with live Printify costs
Auto-generate listing photos from your mockup templates
Save the entire configuration as a preset, then Bulk Create dozens of listings from it — one design upload per listing
The time-savings math
Here's what a single print-on-demand listing actually costs you in manual work, and where ListingView removes it.
Step | By hand, every listing | In ListingView |
|---|---|---|
Choose blueprint + print provider | Every time | Once, saved in the preset |
Select colors and sizes | Every time | Once, saved in the preset |
Place the design on each print area | Every time | Once for fixed designs; a placeholder slot for the artwork that changes |
Price every variant | Every time — a 5-color × 6-size tee is 30 variants | Once, saved in the preset |
Write description, core details, category, shipping, returns | Every time | Once, saved in the preset |
Upload the new design | Every time | Every time — this is the part that's genuinely per-listing |
Generate listing photos | Every time | Mockup slots render automatically from the design |
After the preset exists, a new listing is: type a title, upload a design. Everything else is already decided.
How the pieces fit together
There are four moving parts. Understanding how they relate makes everything else obvious.
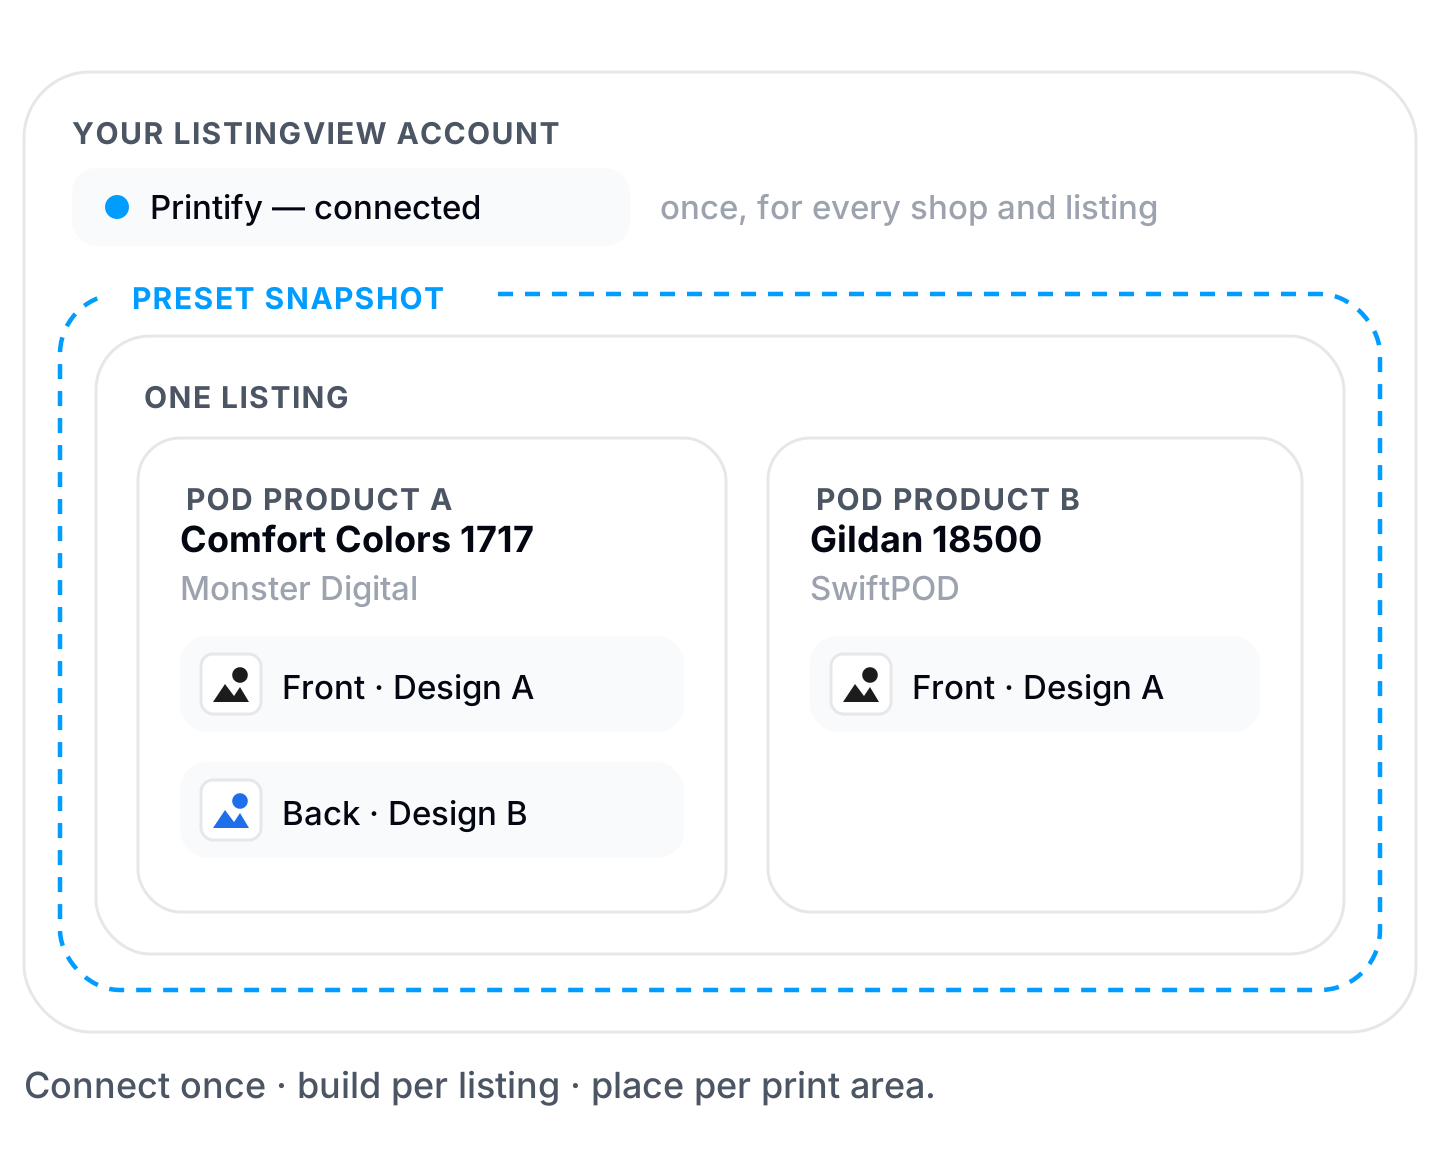
Printify connection — an account-level link between ListingView and Printify, authorized once through Printify's own login screen. This is what makes the catalog, the print providers, and the real production costs available inside ListingView.
POD product — a specific product attached to a specific listing: a blueprint (e.g. "Comfort Colors 1717 Garment Dyed Tee"), a print provider that fulfills it, and the set of colors and sizes you chose. A listing can hold several.
Design file — an image linked to a POD product, a print area on that product (front, back, sleeve), and a set of color options. One design can cover every color, or you can split light and dark colorways across two designs.
Preset — a saved snapshot of the whole thing. A POD preset carries the products, the color and size selections, the variant pricing, and the design placements, so a new listing inherits all of it.
Getting started
1. Connect Printify
Open any listing in Listing Optimizer, scroll to the Product section, and switch the deliverable type to POD. If Printify isn't connected yet, a Connect your Printify dialog appears.
Click Connect Printify. You'll be sent to Printify to authorize the connection, then returned to ListingView. You only do this once per account — every listing and every shop you manage uses the same connection.
You can also manage the connection later from Settings → Account.
2. Build one POD product
With Printify connected, the POD panel appears. Click + Add Product to browse the catalog, pick a print provider, and select your colors and sizes.
Full walkthrough: Setting Up a POD Product.
3. Add your designs
Below the product, the design panel is where you upload artwork and place it on print areas. Designs can be uploaded directly or pulled from your Asset Library, and you can reserve empty placeholder slots for artwork that changes per listing.
Full walkthrough: Designs & Mockups.
4. Save it as a preset and Bulk Create
Once one listing is exactly right, save it as a preset. From there, Bulk Create produces a batch of Etsy drafts — each one a complete multi-variant POD listing — from a single design upload per row.
Full walkthrough: POD Presets & Bulk Create.
Key concepts
Blueprint — Printify's term for a base product model, like "Comfort Colors 1717 Garment Dyed Tee" or "Gildan 18500 Hoodie". It defines the available colors, sizes, and print areas.
Print provider — the printing facility that actually fulfills the product. Different providers offer different colors, costs, and delivery windows for the same blueprint. Printify Choice is Printify's automatic pick.
Print area — a printable region on the product: front, back, left sleeve, and so on. Each has its own dimensions, and a design is placed onto a specific one.
Variant — a single sellable combination of options, like "Black / Large". A 5-color × 6-size product has 30 variants, each with its own production cost, price, quantity, and SKU.
Variant matrix — the grid under Variations where you price and stock every variant at once.
Design placement — the link between one design file, one product, one print area, and a set of colors. This is what tells Printify where to print what.
Placeholder slot — a design placement with everything decided except the artwork: product, print area, colors, and position are all saved; only the file is missing. Presets use these to say "this listing needs one design here" without baking in a specific image.
Mockup slot — a listing photo position that renders automatically from one of your mockup templates plus one of your designs, instead of an image you upload by hand.
Tips & best practices
Get one listing perfect before you scale. Every mistake in a preset multiplies by the number of listings you bulk-create from it. Build one, publish it, look at it on Etsy, then save the preset.
Choose your print provider on delivery time and cost, not just price. The provider step shows a delivery estimate, the available print areas, and a cost note. A provider that's forty cents cheaper but ships in twice the time will cost you more in reviews than you save per unit.
Leave SKUs blank on presets you plan to bulk-create from. ListingView generates a unique SKU per listing automatically. A custom SKU saved into a preset would be cloned identically onto every listing, and Etsy rejects duplicates — so a preset with custom SKUs is treated as a single-listing template, not a bulk one.
Price the variant matrix before saving the preset. The preset's base price comes from your cheapest priced variant. If nothing is priced, Bulk Create can't create the draft.
Use prefixes when bundling products. If a listing holds both a tee and a hoodie, both contribute a "Size" variation with the same S/M/L options. Prefixes turn those into "Tee - M" and "Hoodie - M" so buyers know what they're picking.
Switch product type deliberately. Moving a listing from POD to Physical or Digital removes all linked POD products, variant configurations, and design placements, and it can't be undone.
Common questions
Which print-on-demand providers are supported?
Printify today. ListingView's data model is provider-agnostic and built to add others, but Printify is the connected provider currently available.
Do I need a paid Printify plan?
No. Any Printify account can be connected. Your Printify plan affects your production costs, not the ListingView integration.
Does connecting Printify change my existing Printify products?
No. Connecting only gives ListingView read access to the catalog and the ability to create products on your behalf when you publish. Products you already have in Printify are untouched.
Can one listing sell more than one product?
Yes. Add as many POD products to a listing as you need. Each contributes its own variations, and prefixes keep the option names readable for buyers.
Are listings published live automatically?
No. Bulk Create produces Etsy drafts. You review them in your shop and publish when you're satisfied.
Why is POD marked beta?
The feature is complete and in daily use, but print-on-demand touches a lot of moving parts — a third-party catalog, image rendering, and Etsy's inventory rules. The beta badge is our signal that we're still actively hardening it.
Related features
Setting Up a POD Product — Browse the catalog, pick a print provider, choose options, and price the variant matrix.
Designs & Mockups — Upload artwork, place it on print areas, link colorways, and auto-generate listing photos.
POD Presets & Bulk Create — Turn one POD setup into a batch of Etsy drafts.
Presets — How presets work generally, across all listing types.
Asset Library — Where your design files and mockup templates live.
Print on Demand
Print on Demand (POD) lets you build a real Printify product — blueprint, print provider, colors, sizes, design placement, and per-variant pricing — directly inside a ListingView listing. Once you've built it once, you save it as a preset and Bulk Create turns that single setup into as many Etsy listings as you have designs.
That last part is the whole point. Setting up one POD listing by hand is tedious but survivable. Setting up forty is the reason most sellers stall out. POD in ListingView is designed so you do the tedious part once.
Print on Demand is in beta. You'll see a BETA badge on the POD option inside the listing editor. The feature works end to end, but we're still stabilizing it — if something looks wrong, tell us and we'll get on it quickly.
What you can do with Print on Demand
Connect your Printify account to ListingView once, and browse the full Printify catalog without leaving a listing
Pick a blueprint and a print provider, then choose exactly which colors and sizes you want to sell
Bundle multiple POD products in one listing — a tee, a hoodie, and a mug can all live under a single Etsy listing
Upload designs (or pull them from your Asset Library) and place them on any print area
Assign different designs to different colorways — a light-shirt version and a dark-shirt version of the same artwork
Set price, quantity, and SKU across every variant from one grid, with live Printify costs
Auto-generate listing photos from your mockup templates
Save the entire configuration as a preset, then Bulk Create dozens of listings from it — one design upload per listing
The time-savings math
Here's what a single print-on-demand listing actually costs you in manual work, and where ListingView removes it.
Step | By hand, every listing | In ListingView |
|---|---|---|
Choose blueprint + print provider | Every time | Once, saved in the preset |
Select colors and sizes | Every time | Once, saved in the preset |
Place the design on each print area | Every time | Once for fixed designs; a placeholder slot for the artwork that changes |
Price every variant | Every time — a 5-color × 6-size tee is 30 variants | Once, saved in the preset |
Write description, core details, category, shipping, returns | Every time | Once, saved in the preset |
Upload the new design | Every time | Every time — this is the part that's genuinely per-listing |
Generate listing photos | Every time | Mockup slots render automatically from the design |
After the preset exists, a new listing is: type a title, upload a design. Everything else is already decided.
How the pieces fit together
There are four moving parts. Understanding how they relate makes everything else obvious.
Printify connection — an account-level link between ListingView and Printify, authorized once through Printify's own login screen. This is what makes the catalog, the print providers, and the real production costs available inside ListingView.
POD product — a specific product attached to a specific listing: a blueprint (e.g. "Comfort Colors 1717 Garment Dyed Tee"), a print provider that fulfills it, and the set of colors and sizes you chose. A listing can hold several.
Design file — an image linked to a POD product, a print area on that product (front, back, sleeve), and a set of color options. One design can cover every color, or you can split light and dark colorways across two designs.
Preset — a saved snapshot of the whole thing. A POD preset carries the products, the color and size selections, the variant pricing, and the design placements, so a new listing inherits all of it.
Getting started
1. Connect Printify
Open any listing in Listing Optimizer, scroll to the Product section, and switch the deliverable type to POD. If Printify isn't connected yet, a Connect your Printify dialog appears.
Click Connect Printify. You'll be sent to Printify to authorize the connection, then returned to ListingView. You only do this once per account — every listing and every shop you manage uses the same connection.
You can also manage the connection later from Settings → Account.
2. Build one POD product
With Printify connected, the POD panel appears. Click + Add Product to browse the catalog, pick a print provider, and select your colors and sizes.
Full walkthrough: Setting Up a POD Product.
3. Add your designs
Below the product, the design panel is where you upload artwork and place it on print areas. Designs can be uploaded directly or pulled from your Asset Library, and you can reserve empty placeholder slots for artwork that changes per listing.
Full walkthrough: Designs & Mockups.
4. Save it as a preset and Bulk Create
Once one listing is exactly right, save it as a preset. From there, Bulk Create produces a batch of Etsy drafts — each one a complete multi-variant POD listing — from a single design upload per row.
Full walkthrough: POD Presets & Bulk Create.
Key concepts
Blueprint — Printify's term for a base product model, like "Comfort Colors 1717 Garment Dyed Tee" or "Gildan 18500 Hoodie". It defines the available colors, sizes, and print areas.
Print provider — the printing facility that actually fulfills the product. Different providers offer different colors, costs, and delivery windows for the same blueprint. Printify Choice is Printify's automatic pick.
Print area — a printable region on the product: front, back, left sleeve, and so on. Each has its own dimensions, and a design is placed onto a specific one.
Variant — a single sellable combination of options, like "Black / Large". A 5-color × 6-size product has 30 variants, each with its own production cost, price, quantity, and SKU.
Variant matrix — the grid under Variations where you price and stock every variant at once.
Design placement — the link between one design file, one product, one print area, and a set of colors. This is what tells Printify where to print what.
Placeholder slot — a design placement with everything decided except the artwork: product, print area, colors, and position are all saved; only the file is missing. Presets use these to say "this listing needs one design here" without baking in a specific image.
Mockup slot — a listing photo position that renders automatically from one of your mockup templates plus one of your designs, instead of an image you upload by hand.
Tips & best practices
Get one listing perfect before you scale. Every mistake in a preset multiplies by the number of listings you bulk-create from it. Build one, publish it, look at it on Etsy, then save the preset.
Choose your print provider on delivery time and cost, not just price. The provider step shows a delivery estimate, the available print areas, and a cost note. A provider that's forty cents cheaper but ships in twice the time will cost you more in reviews than you save per unit.
Leave SKUs blank on presets you plan to bulk-create from. ListingView generates a unique SKU per listing automatically. A custom SKU saved into a preset would be cloned identically onto every listing, and Etsy rejects duplicates — so a preset with custom SKUs is treated as a single-listing template, not a bulk one.
Price the variant matrix before saving the preset. The preset's base price comes from your cheapest priced variant. If nothing is priced, Bulk Create can't create the draft.
Use prefixes when bundling products. If a listing holds both a tee and a hoodie, both contribute a "Size" variation with the same S/M/L options. Prefixes turn those into "Tee - M" and "Hoodie - M" so buyers know what they're picking.
Switch product type deliberately. Moving a listing from POD to Physical or Digital removes all linked POD products, variant configurations, and design placements, and it can't be undone.
Common questions
Which print-on-demand providers are supported?
Printify today. ListingView's data model is provider-agnostic and built to add others, but Printify is the connected provider currently available.
Do I need a paid Printify plan?
No. Any Printify account can be connected. Your Printify plan affects your production costs, not the ListingView integration.
Does connecting Printify change my existing Printify products?
No. Connecting only gives ListingView read access to the catalog and the ability to create products on your behalf when you publish. Products you already have in Printify are untouched.
Can one listing sell more than one product?
Yes. Add as many POD products to a listing as you need. Each contributes its own variations, and prefixes keep the option names readable for buyers.
Are listings published live automatically?
No. Bulk Create produces Etsy drafts. You review them in your shop and publish when you're satisfied.
Why is POD marked beta?
The feature is complete and in daily use, but print-on-demand touches a lot of moving parts — a third-party catalog, image rendering, and Etsy's inventory rules. The beta badge is our signal that we're still actively hardening it.
Related features
Setting Up a POD Product — Browse the catalog, pick a print provider, choose options, and price the variant matrix.
Designs & Mockups — Upload artwork, place it on print areas, link colorways, and auto-generate listing photos.
POD Presets & Bulk Create — Turn one POD setup into a batch of Etsy drafts.
Presets — How presets work generally, across all listing types.
Asset Library — Where your design files and mockup templates live.
Print on Demand is in beta. It’s your responsibility to make sure design quality, print placement, and order details are correct before an order goes into production. By using the integration, you agree to our Terms of Service and understand that ListingView is not responsible for order accuracy.
Still need help?
Can’t find what you’re looking for? Our team is happy to help.
Summarize