Print on Demand
Presets & Bulk Create
Save a finished print-on-demand setup as a preset, then create dozens of complete multi-variant Etsy drafts from one design upload per listing.
Updated
POD Presets & Bulk Create
This is where print-on-demand in ListingView pays for itself.
A POD preset stores everything you configured on a working listing — the products, the colors and sizes, the variant pricing, the design placements, and all the ordinary listing fields. Bulk Create then turns that preset into a batch of complete Etsy drafts. Each new listing needs a title and a design. Everything else is already decided.
What a POD preset carries
A regular preset saves listing fields. A POD preset saves those plus the entire print-on-demand configuration:
Saved in the preset | What it means for a new listing |
|---|---|
POD products (blueprint + print provider) | No catalog browsing |
Selected colors and sizes | No option picking |
Variant matrix — price, quantity, on/off | No pricing 30 rows by hand |
Variation prefixes and renamed options | Buyer-facing names already correct |
Fixed design placements | Logos, back prints, sleeve marks already positioned |
Placeholder design slots | Reserved positions waiting for this listing's artwork |
Mockup slot configuration | Listing photos render automatically |
Description, core details, category, tags, materials | Written once |
Shipping profile, return policy, renewal option | Chosen once |
The result: a 30-variant, multi-colorway, photo-complete POD listing is reduced to two per-listing inputs — a title and a design file.
Creating a POD preset
There are two routes, and the second one is usually better.
Save a working listing as a preset (recommended)
Build one POD listing completely. Add the product, place the designs, price the variants, configure mockup slots, fill in description and shipping. Publish it and look at it on Etsy. When it's genuinely right:
Open the listing in Listing Optimizer
Click Presets in the editor toolbar
Click Save as Preset, name it, and save
Everything — including the POD configuration — is captured. This is the recommended path because you're saving something you've verified rather than something you hope is right.
Build one from scratch on the Presets page
The Presets page runs the same listing editor, so the Product section behaves identically: switch to POD, add products, place designs, price the matrix. Name the preset and click Save.
Presets carrying POD products are badged Print on Demand in every preset picker, so you can tell them apart from Physical and Digital templates at a glance.
Fixed designs vs. placeholder slots
This distinction is the whole design of the feature, so it's worth being deliberate about.
A fixed design is baked into the preset and prints identically on every listing created from it. Use it for your shop logo, a standard back print, a sleeve mark.
A placeholder slot reserves everything except the artwork — the product, the print area, which colors it covers, and the placement rule. Every listing built from the preset gets that slot back, empty, waiting for one file.
A preset with a fixed back logo and a front placeholder is the fastest POD workflow available: one upload per listing, everything else automatic.
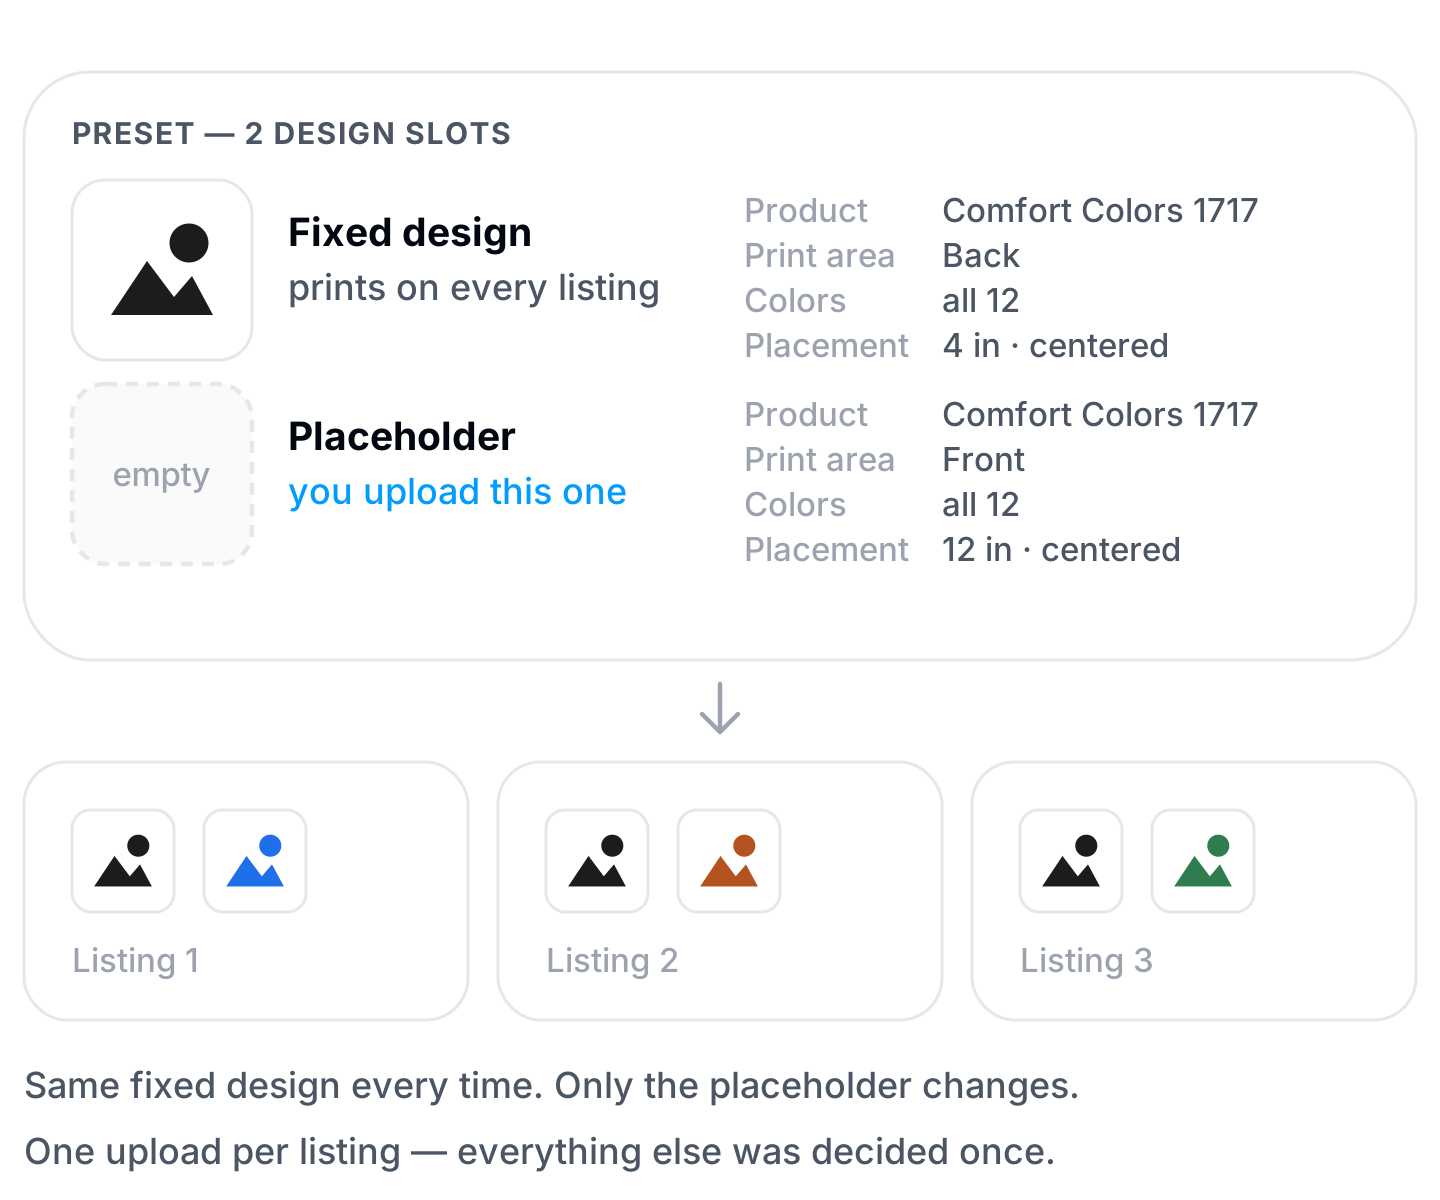
See Designs & Mockups for how to create each.
Bulk Create readiness
Before a preset can be used for Bulk Create it has to satisfy a checklist. On the Presets page, the Bulk-create button shows how many requirements you've met — hover it for the full panel with a progress bar.
A POD preset must have all eight:
Description filled
Core details filled (who made it, what is it, when was it made)
Etsy category selected
Shipping profile selected
Return policy selected
Renewal option selected
Base price set
No custom SKUs (auto-generated for bulk)
The last two are POD-specific and are where most presets get stuck.
Base price set. POD listings are priced per variant, so Bulk Create hides the per-row price field entirely. That means the preset itself has to carry a base price or Etsy rejects the draft with an empty-price error. You don't enter it separately — ListingView derives it from your cheapest priced variant. Price the variant matrix, re-save the preset, and the requirement clears.
No custom SKUs. ListingView mints a unique SKU per listing at creation time. If the preset carries a hard-coded SKU, every listing in the batch would get the identical code and Etsy rejects duplicates. A POD preset with custom SKUs is therefore treated as a single-listing "apply" template — still perfectly usable on one listing at a time, just not for batches. Clear the SKU fields in the variant matrix and re-save to make it bulk-eligible.
When everything passes, the bar turns green: "All requirements met! You can bulk-create listings."
In the Bulk Create preset picker, ineligible presets are still listed but disabled with a badge telling you why — Setup needed or Custom SKUs.
Creating listings in bulk
Click Bulk-create from the Presets page, or open Bulk Create and choose your POD preset from the picker.
What changes for POD presets
The Bulk Create grid adapts when a POD preset is loaded:
Price, Quantity, and SKU columns disappear from the rows and from the "Apply to all" toolbar. Those come from the variant matrix in the preset, not from the grid.
Design slots appear on every row — one per design placement in your preset. Your fixed designs show up as already-filled cards with no upload control; your placeholders show up empty, waiting for this listing's artwork.
That's the whole difference. Everything else about Bulk Create works normally.
Filling the design slots
Each row shows its reserved design slots. For each one, either:
Upload a file from your computer, or
Browse Library to pick from your Asset Library
Each filled slot shows the design thumbnail and the product it's linked to, with Replace design and Remove design controls. Slots bind in order — the first slot is Design A, the second is Design B — which is how mockup slots configured in the preset know which artwork to render.
Wait for uploads to finish before creating. A slot that's still uploading isn't ready to be attached to the listing.
Running the batch
From here it's standard Bulk Create:
Add rows with the + button. New rows inherit the preset's structure and copy the previous row's title and tags as a starting point.
Write titles and tags per row, or use the batch toolbar to apply a change across every row — add to front, add to end, override, or find and replace, with a live preview of what will change.
Generate with AI if you'd rather not write forty titles by hand. See AI Writing Assistant.
Click Create as Draft. A progress bar tracks the batch, and completed listings fade out of the table.
Pause, resume, or cancel at any point. A paused job picks up where it left off.
Every listing is created as an Etsy draft. Nothing goes live until you publish it, so you get a review pass before customers see anything.
A realistic workflow
Here's what a productive session actually looks like once the preset exists.
Monday, once. Build one POD listing properly — Comfort Colors tee, 6 colors, 5 sizes, front placeholder plus fixed back logo, variant matrix priced, two mockup slots configured. Publish it, check it on Etsy, fix anything that looks off. Save it as a preset. Call it an hour.
Every session after. Open Bulk Create, pick the preset, add a row per design. Upload each design into its slot, write or AI-generate the titles, click Create as Draft.
Review. Open the drafts, confirm the mockups rendered and the titles read well, publish.
The 30-variant pricing grid, the color coverage, the design placement, the shipping profile, the category — none of it is touched again. That work happened in step 1 and is now amortized across every listing you'll ever make from that product.
Tips & best practices
Publish one listing from a new preset before running a batch of forty. Any mistake in a preset multiplies. Create a single draft, publish it, look at the live Etsy listing, then scale.
Keep one preset per product-and-placement combination. "Comfort Colors Tee — Front Print" and "Gildan Hoodie — Front + Sleeve" as separate presets beats one preset you edit constantly. Presets are free; confusion isn't.
Re-save the preset after changing variant pricing. The base price is derived at save time. Adjust prices in the matrix and the preset keeps the old base price until you save again.
Batch in groups of 10–15. Big enough to be efficient, small enough that you'll actually review the drafts properly instead of publishing them blind.
Name design files so they sort into the right rows. When you're uploading twenty designs across twenty rows, filenames that match your intended titles keep you from having to open each thumbnail.
Let AI draft the titles, then edit. Generating forty titles and editing them is meaningfully faster than writing forty from scratch, and it keeps keyword coverage consistent across the batch.
Check the drafts before publishing. Mockups render in the background — give them a moment and confirm each listing has its photos before going live.
Common questions
Do I need a preset to bulk-create POD listings?
Yes. The preset supplies the POD products, the variant pricing, and the design placements. Without one, Bulk Create has nothing to build from.
Why are the Price and Quantity columns missing?
Because a POD listing is priced per variant in the preset's variant matrix, not per listing. A single price field on the row would be meaningless when the listing has thirty variants at different price points.
My preset says "Setup needed" — what's wrong?
It's missing one of the eight requirements. Open it on the Presets page and hover the Bulk-create button to see exactly which check is failing.
My preset says "Custom SKUs" — what's wrong?
The variant matrix has SKU values typed in. Clear them and re-save. ListingView generates a unique SKU per listing automatically; a fixed one would be duplicated across the batch and rejected by Etsy.
How many design slots does each row get?
One per design placement in the preset — fixed designs included, shown already filled. Only the placeholders need your input. A listing can bind at most ten designs (labeled A–J); an eleventh upload is rejected.
Can I change the POD product for just one listing in the batch?
Not from the Bulk Create grid — the product configuration comes from the preset and applies to the whole batch. Create the drafts, then edit that individual listing afterward.
What if a listing fails to create?
Each listing is processed independently. Failures don't stop the rest of the batch, and the progress view shows which ones failed with the error. Fix those rows and run them again.
Can I run two batches at once?
No — one Bulk Create job per shop at a time. Let the current one finish first.
Are the listings live on Etsy right away?
No. Everything is created as a draft. You publish when you're satisfied.
Related features
Print on Demand — Overview and Printify setup.
Setting Up a POD Product — Build the product the preset saves.
Designs & Mockups — Fixed designs, placeholder slots, and mockup slots.
Presets — How presets work across all listing types.
POD Presets & Bulk Create
This is where print-on-demand in ListingView pays for itself.
A POD preset stores everything you configured on a working listing — the products, the colors and sizes, the variant pricing, the design placements, and all the ordinary listing fields. Bulk Create then turns that preset into a batch of complete Etsy drafts. Each new listing needs a title and a design. Everything else is already decided.
What a POD preset carries
A regular preset saves listing fields. A POD preset saves those plus the entire print-on-demand configuration:
Saved in the preset | What it means for a new listing |
|---|---|
POD products (blueprint + print provider) | No catalog browsing |
Selected colors and sizes | No option picking |
Variant matrix — price, quantity, on/off | No pricing 30 rows by hand |
Variation prefixes and renamed options | Buyer-facing names already correct |
Fixed design placements | Logos, back prints, sleeve marks already positioned |
Placeholder design slots | Reserved positions waiting for this listing's artwork |
Mockup slot configuration | Listing photos render automatically |
Description, core details, category, tags, materials | Written once |
Shipping profile, return policy, renewal option | Chosen once |
The result: a 30-variant, multi-colorway, photo-complete POD listing is reduced to two per-listing inputs — a title and a design file.
Creating a POD preset
There are two routes, and the second one is usually better.
Save a working listing as a preset (recommended)
Build one POD listing completely. Add the product, place the designs, price the variants, configure mockup slots, fill in description and shipping. Publish it and look at it on Etsy. When it's genuinely right:
Open the listing in Listing Optimizer
Click Presets in the editor toolbar
Click Save as Preset, name it, and save
Everything — including the POD configuration — is captured. This is the recommended path because you're saving something you've verified rather than something you hope is right.
Build one from scratch on the Presets page
The Presets page runs the same listing editor, so the Product section behaves identically: switch to POD, add products, place designs, price the matrix. Name the preset and click Save.
Presets carrying POD products are badged Print on Demand in every preset picker, so you can tell them apart from Physical and Digital templates at a glance.
Fixed designs vs. placeholder slots
This distinction is the whole design of the feature, so it's worth being deliberate about.
A fixed design is baked into the preset and prints identically on every listing created from it. Use it for your shop logo, a standard back print, a sleeve mark.
A placeholder slot reserves everything except the artwork — the product, the print area, which colors it covers, and the placement rule. Every listing built from the preset gets that slot back, empty, waiting for one file.
A preset with a fixed back logo and a front placeholder is the fastest POD workflow available: one upload per listing, everything else automatic.
See Designs & Mockups for how to create each.
Bulk Create readiness
Before a preset can be used for Bulk Create it has to satisfy a checklist. On the Presets page, the Bulk-create button shows how many requirements you've met — hover it for the full panel with a progress bar.
A POD preset must have all eight:
Description filled
Core details filled (who made it, what is it, when was it made)
Etsy category selected
Shipping profile selected
Return policy selected
Renewal option selected
Base price set
No custom SKUs (auto-generated for bulk)
The last two are POD-specific and are where most presets get stuck.
Base price set. POD listings are priced per variant, so Bulk Create hides the per-row price field entirely. That means the preset itself has to carry a base price or Etsy rejects the draft with an empty-price error. You don't enter it separately — ListingView derives it from your cheapest priced variant. Price the variant matrix, re-save the preset, and the requirement clears.
No custom SKUs. ListingView mints a unique SKU per listing at creation time. If the preset carries a hard-coded SKU, every listing in the batch would get the identical code and Etsy rejects duplicates. A POD preset with custom SKUs is therefore treated as a single-listing "apply" template — still perfectly usable on one listing at a time, just not for batches. Clear the SKU fields in the variant matrix and re-save to make it bulk-eligible.
When everything passes, the bar turns green: "All requirements met! You can bulk-create listings."
In the Bulk Create preset picker, ineligible presets are still listed but disabled with a badge telling you why — Setup needed or Custom SKUs.
Creating listings in bulk
Click Bulk-create from the Presets page, or open Bulk Create and choose your POD preset from the picker.
What changes for POD presets
The Bulk Create grid adapts when a POD preset is loaded:
Price, Quantity, and SKU columns disappear from the rows and from the "Apply to all" toolbar. Those come from the variant matrix in the preset, not from the grid.
Design slots appear on every row — one per design placement in your preset. Your fixed designs show up as already-filled cards with no upload control; your placeholders show up empty, waiting for this listing's artwork.
That's the whole difference. Everything else about Bulk Create works normally.
Filling the design slots
Each row shows its reserved design slots. For each one, either:
Upload a file from your computer, or
Browse Library to pick from your Asset Library
Each filled slot shows the design thumbnail and the product it's linked to, with Replace design and Remove design controls. Slots bind in order — the first slot is Design A, the second is Design B — which is how mockup slots configured in the preset know which artwork to render.
Wait for uploads to finish before creating. A slot that's still uploading isn't ready to be attached to the listing.
Running the batch
From here it's standard Bulk Create:
Add rows with the + button. New rows inherit the preset's structure and copy the previous row's title and tags as a starting point.
Write titles and tags per row, or use the batch toolbar to apply a change across every row — add to front, add to end, override, or find and replace, with a live preview of what will change.
Generate with AI if you'd rather not write forty titles by hand. See AI Writing Assistant.
Click Create as Draft. A progress bar tracks the batch, and completed listings fade out of the table.
Pause, resume, or cancel at any point. A paused job picks up where it left off.
Every listing is created as an Etsy draft. Nothing goes live until you publish it, so you get a review pass before customers see anything.
A realistic workflow
Here's what a productive session actually looks like once the preset exists.
Monday, once. Build one POD listing properly — Comfort Colors tee, 6 colors, 5 sizes, front placeholder plus fixed back logo, variant matrix priced, two mockup slots configured. Publish it, check it on Etsy, fix anything that looks off. Save it as a preset. Call it an hour.
Every session after. Open Bulk Create, pick the preset, add a row per design. Upload each design into its slot, write or AI-generate the titles, click Create as Draft.
Review. Open the drafts, confirm the mockups rendered and the titles read well, publish.
The 30-variant pricing grid, the color coverage, the design placement, the shipping profile, the category — none of it is touched again. That work happened in step 1 and is now amortized across every listing you'll ever make from that product.
Tips & best practices
Publish one listing from a new preset before running a batch of forty. Any mistake in a preset multiplies. Create a single draft, publish it, look at the live Etsy listing, then scale.
Keep one preset per product-and-placement combination. "Comfort Colors Tee — Front Print" and "Gildan Hoodie — Front + Sleeve" as separate presets beats one preset you edit constantly. Presets are free; confusion isn't.
Re-save the preset after changing variant pricing. The base price is derived at save time. Adjust prices in the matrix and the preset keeps the old base price until you save again.
Batch in groups of 10–15. Big enough to be efficient, small enough that you'll actually review the drafts properly instead of publishing them blind.
Name design files so they sort into the right rows. When you're uploading twenty designs across twenty rows, filenames that match your intended titles keep you from having to open each thumbnail.
Let AI draft the titles, then edit. Generating forty titles and editing them is meaningfully faster than writing forty from scratch, and it keeps keyword coverage consistent across the batch.
Check the drafts before publishing. Mockups render in the background — give them a moment and confirm each listing has its photos before going live.
Common questions
Do I need a preset to bulk-create POD listings?
Yes. The preset supplies the POD products, the variant pricing, and the design placements. Without one, Bulk Create has nothing to build from.
Why are the Price and Quantity columns missing?
Because a POD listing is priced per variant in the preset's variant matrix, not per listing. A single price field on the row would be meaningless when the listing has thirty variants at different price points.
My preset says "Setup needed" — what's wrong?
It's missing one of the eight requirements. Open it on the Presets page and hover the Bulk-create button to see exactly which check is failing.
My preset says "Custom SKUs" — what's wrong?
The variant matrix has SKU values typed in. Clear them and re-save. ListingView generates a unique SKU per listing automatically; a fixed one would be duplicated across the batch and rejected by Etsy.
How many design slots does each row get?
One per design placement in the preset — fixed designs included, shown already filled. Only the placeholders need your input. A listing can bind at most ten designs (labeled A–J); an eleventh upload is rejected.
Can I change the POD product for just one listing in the batch?
Not from the Bulk Create grid — the product configuration comes from the preset and applies to the whole batch. Create the drafts, then edit that individual listing afterward.
What if a listing fails to create?
Each listing is processed independently. Failures don't stop the rest of the batch, and the progress view shows which ones failed with the error. Fix those rows and run them again.
Can I run two batches at once?
No — one Bulk Create job per shop at a time. Let the current one finish first.
Are the listings live on Etsy right away?
No. Everything is created as a draft. You publish when you're satisfied.
Related features
Print on Demand — Overview and Printify setup.
Setting Up a POD Product — Build the product the preset saves.
Designs & Mockups — Fixed designs, placeholder slots, and mockup slots.
Presets — How presets work across all listing types.
Print on Demand is in beta. It’s your responsibility to make sure design quality, print placement, and order details are correct before an order goes into production. By using the integration, you agree to our Terms of Service and understand that ListingView is not responsible for order accuracy.
Still need help?
Can’t find what you’re looking for? Our team is happy to help.
Summarize